
Use the Cloud to Give Students Instant Access
Did you know that Zoom meeting recordings can be sent directly to Panopto? In fact, you can have them sent directly to a course folder giving students easy access. However, In order to do this, you will first need to configure your Zoom settings for cloud recording and then learn the process for recording meetings in Zoom. This guide will take you through the steps of logging into Zoom, configuring your settings for cloud recording, creating a meeting, and finally, recording a meeting so that it goes directly to Panopto.
NOTE: Please review: ZOOM and FERPA compliance
STEP 1: Before you start, consider your Zoom settings
Recording Settings
- Meetings can be recorded.
- Zoom asks you to choose to record meetings to either the Cloud or to your Computer.
- When recording to the Zoom Cloud, recordings are automatically saved into your Panopto “Meeting Recordings” folder inside “My Folder.”
- Recording to your computer precludes automatic copying of Zoom recordings to Panopto. If you are not using Canvas and Panopto, but still want to record your Zoom meeting, then record the meeting to your local computer.
- How to Keep Uninvited Guests Out of Your Zoom Event.
Moderator Settings
- You can set your default meeting settings.
- Sign in to the Zoom web portal – https://bellevuecollege.zoom.us
- In the navigation panel, click Settings.
- When you choose ‘Record to the Cloud’, the video, audio, and chat text are saved in your Zoom account, and your Zoom recording will automatically be copied to your Panopto “Meeting Recordings” folder inside “My Folder.”
- If you would like to have your Zoom recordings sent directly to a particular course folder for easy access and viewing from students in that course, we recommend setting up Zoom-to-Panopto integration. You may also manually manage recording files by logging in to Panopto via Canvas and moving recordings to another (class) folder.
Zoom Global Default Settings
- Zoom sets many of your meeting settings itself. You may change these.
- Three Zoom features are disabled by default: Annotation, Whiteboard, and Chat.
- If these features support your pedagogical objectives, you can easily turn them back on.
- If you do enable chat, we strongly recommend that you leave private chat between participants disabled.
- Sign in to the BC Zoom web portal at https://bellevuecollege.zoom.us
- In the left sidebar, click Settings, and then click In Meeting (Basic).
- Scroll down to find the setting you want to turn on (or use CTRL+F or Command+F and search for “Chat,” “Annotation,” or “Whiteboard”.
- Toggle on the chosen setting(s).
STEP 2: Start a Zoom meeting
- Log in to Zoom.us and navigate to your meeting.
- Hover over the meeting instance and select ‘Start’, or you can open the meeting details by selecting it, reviewing your settings, and then selecting ‘Start’ (blue button).
STEP 3: Manage the meeting
Some potential problems, and how to solve them:
- Do not allow another participant to remotely control your screen.
- We recommend adding a Waiting Room to your class meetings. This way, you will see who wants in and can admit your students one by one. You do not want random people in your public event to take control of the screen and sharing unwanted content with the group. You can restrict this — before the meeting and during the meeting in the host control bar — so that you’re the only one who can screen-share.
- To prevent participants from screen sharing during a call, using the host controls at the bottom, click the arrow next to Share Screen and then Advanced Sharing Options.
- Under “Who can share?” choose “Only Host” and close the window. You can also lock the Screen Share by default for all your meetings in your web settings.
- Mute participants: Hosts can mute/unmute individual participants or all of them at once. Hosts can block unwanted, distracting, or inappropriate noise from other participants. You can also enable Mute Upon Entry in your settings to keep the clamor at bay in large meetings.
- Turn off file transfer: Toggle this off to keep the chat from getting bombarded with unsolicited pics, and other content.
- Disable private chat: Restrict participants’ ability to chat among themselves while your event is going on and cut back on distractions.
STEP 4: Start a cloud recording, end the meeting
Note: Only hosts and co-hosts can start a cloud recording. If you want a participant to start a recording, you can make them a co-host or use local recording. Recordings started by co-hosts will still appear in the host’s recordings in the Zoom web portal.
To record a meeting to the cloud:
1. Start a meeting as the host.
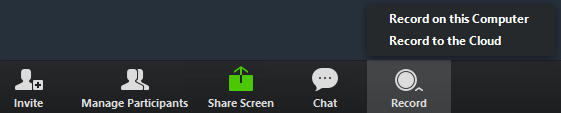
2. Click the Record button in the Zoom toolbar.
3. Select Record to the Cloud to begin recording.
4. To pause a recording, click Pause Recording. This keeps the same meeting, but just pauses the recording, so that when you un-pause, the recording is appended to the previous recording file.
5. If you click Stop Recording, an entirely new video file will begin.

6. To end the recording for good, click End Meeting For All. This also closes out the meeting and kicks out all participants.
7. Once the meeting has ended, the recording will be processed before viewing. The Zoom Cloud recording will not actually start processing until you end the meeting for all. Zoom and Panopto will send an email to the host’s email address when the process is completed.
Your Zoom Cloud recordings are now automatically stored in Panopto, where they are available only to you. You can find your recordings in your Panopto My Folder > Meeting Recordings folder. If you’re recording class meetings, we recommend that you set up a connection between your Zoom Meeting ID and your Canvas class in Panopto. See the next (“extra credit”) step for instructions.
Addendum 1: How to download and delete Zoom cloud files
Addendum 2: How can I learn more about Zoom?
Last Updated January 9, 2025