
Explore the information below to learn how to search for classes in Bellevue College’s ctcLink public class schedule.
Choose your preferred format:
Step-by-Step ctcLink Class Search Tutorial
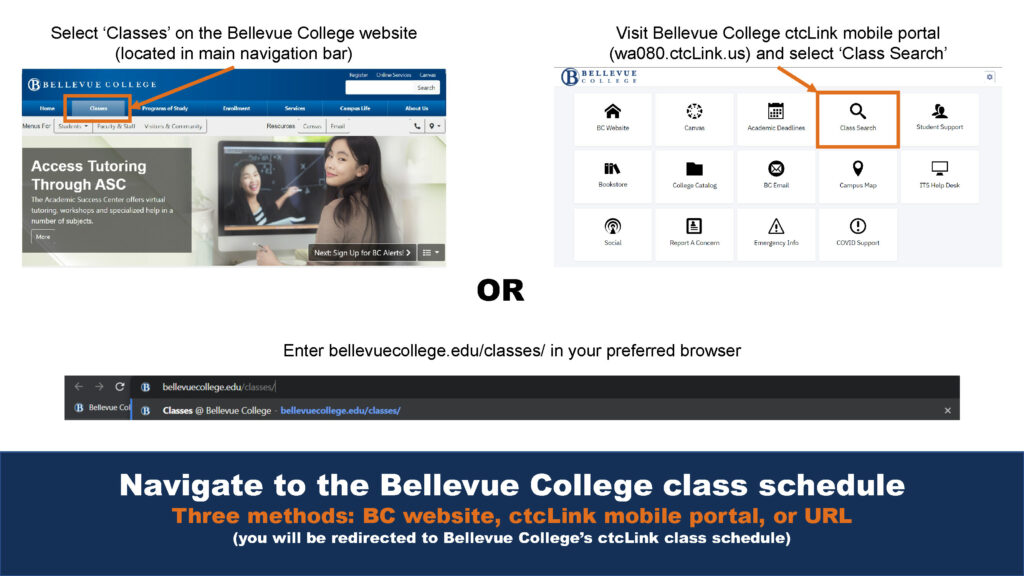
Step One: Navigate to the Bellevue College class schedule.
Three methods: BC website, ctcLink mobile portal, or use a URL. Please note that all methods redirect to Bellevue College’s ctcLink class schedule.
Method One: Select ‘Classes’ on the Bellevue College website (located in main navigation bar): https://www.bellevuecollege.edu/.
Method Two: Visit Bellevue College ctcLink mobile portal (wa080.ctcLink.us) and select ‘Class Search’.
Method Three: Enter https://www.bellevuecollege.edu/classes/ in your preferred browser.
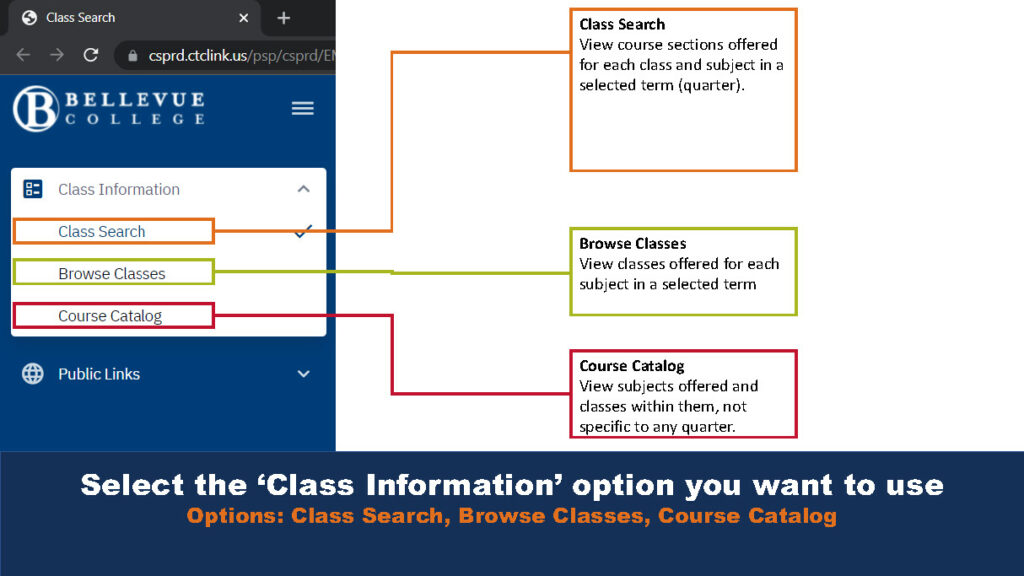
Step Two: Select the ‘Class Information’ option you want to use.
There are three options:
- Class Search
- View course sections offered for each class and subject in a selected term (quarter).
- Browse Classes
- View classes offered for each subject in a selected term
- Course Catalog
- View subjects offered and classes within them, not specific to any quarter.
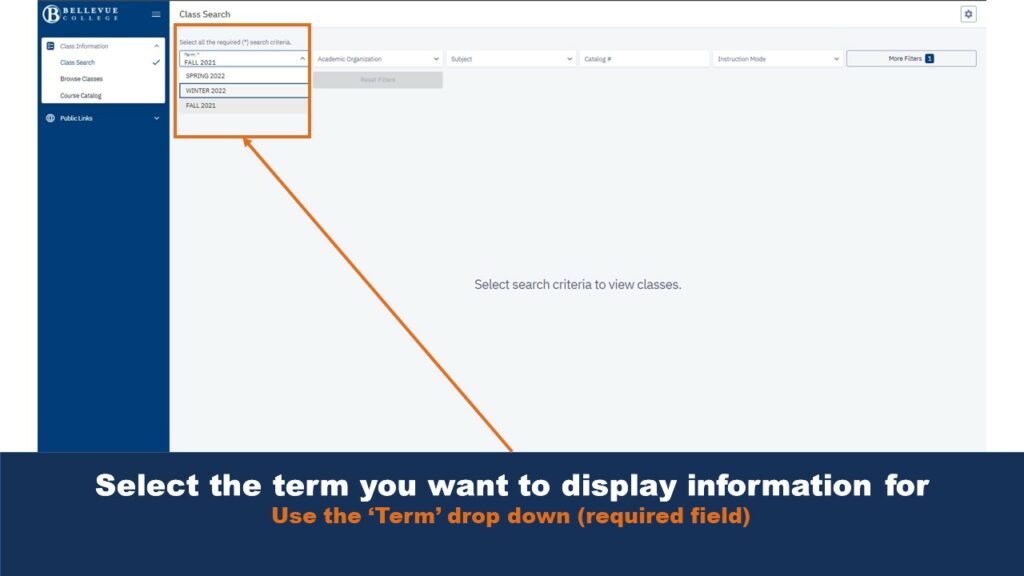
Step Three: Select the term you want to display information for
Use the ‘Term’ drop down. This is a required field.
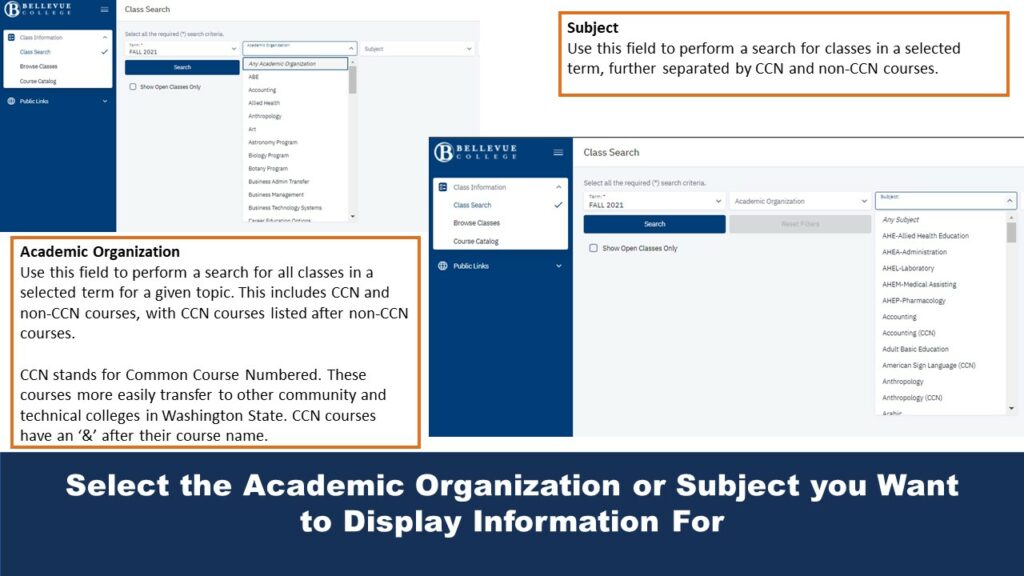
Step Four: Select the Academic Organization or Subject you Want to Display Information For
Academic Organization
Use this field to perform a search for all classes in a selected term for a given topic. This includes CCN and non-CCN courses, with CCN courses listed after non-CCN courses. CCN stands for Common Course Numbered. These courses more easily transfer to other community and technical colleges in Washington State. CCN courses have an ‘&’ after their course name.
Subject
Use this field to perform a search for classes in a selected term, further separated by CCN and non-CCN courses.
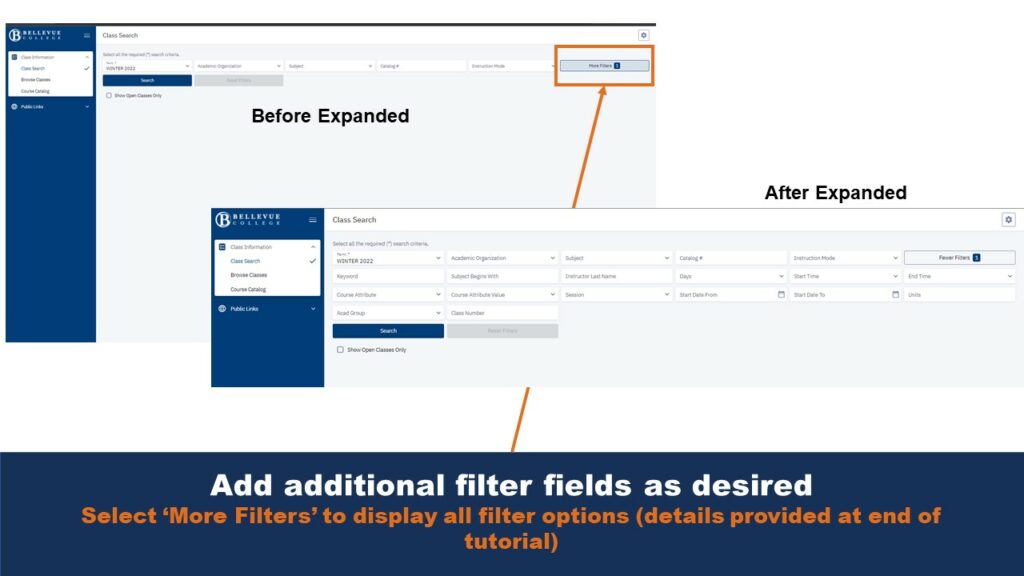
Step Five: Add additional filter fields as desired
Select ‘More Filters’ to display all filter options (details provided at end of tutorial).
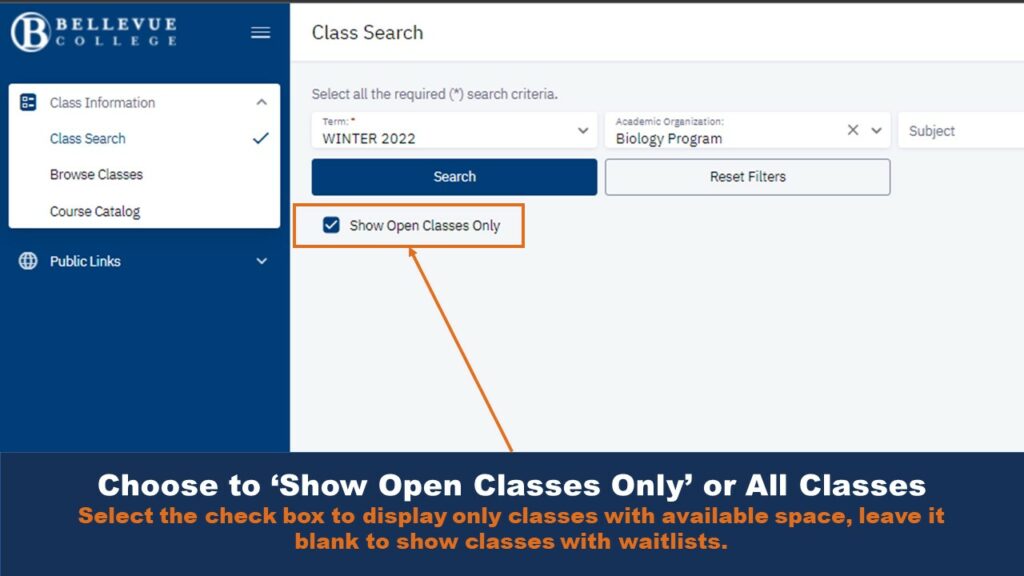
Step Six: Choose to ‘Show Open Classes Only’ or All Classes
Select the check box to display only classes with available space, leave it blank to show classes with waitlists.
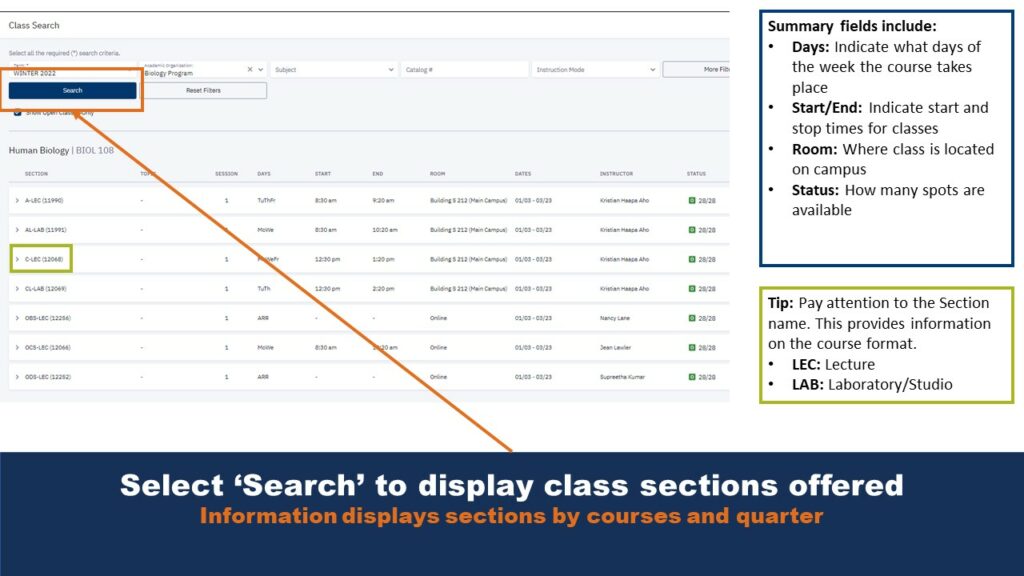
Step Seven: Select ‘Search’ to display class sections offered
Information displays sections by courses and quarter.
Summary fields for each section include:
- Days: Indicate what days of the week the course takes place
- Start/End: Indicate start and stop times for classes
- Room: Where class is located on campus
- Status: How many spots are available
Tip: Pay attention to the Section name. This provides information on the course format.
- LEC: Lecture
- LAB: Laboratory/Studio
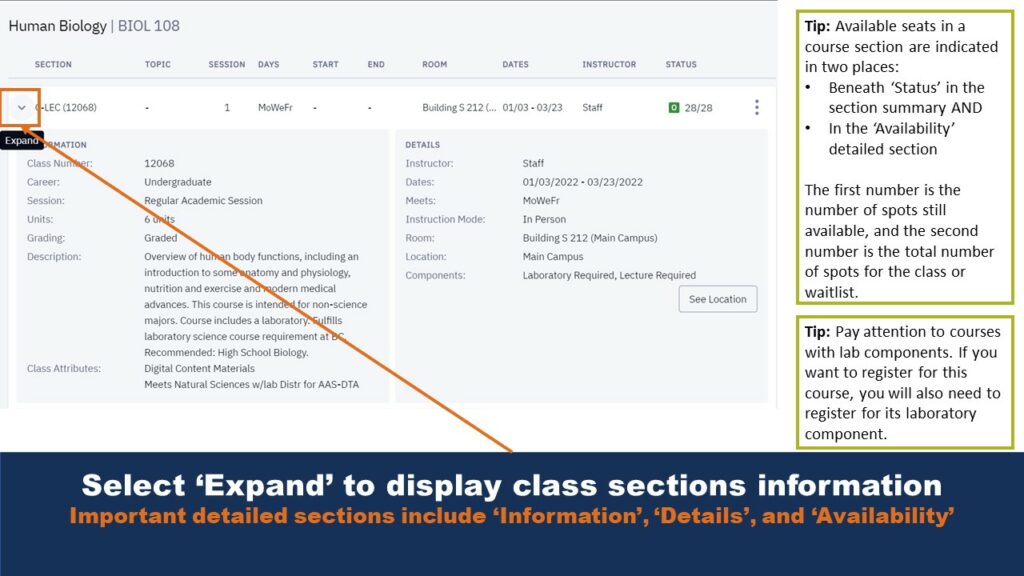
Step Eight: Select ‘Expand’ to display class sections information.
Important detailed sections include ‘Information’, ‘Details’, and ‘Availability’.
Tip: Available seats in a course section are indicated in two places:
- Beneath ‘Status’ in the section summary AND
- In the ‘Availability’ detailed section
The first number is the number of spots still available, and the second number is the total number of spots for the class or waitlist.
Tip: Pay attention to courses with lab components. If you want to register for this course, you will also need to register for its laboratory component.
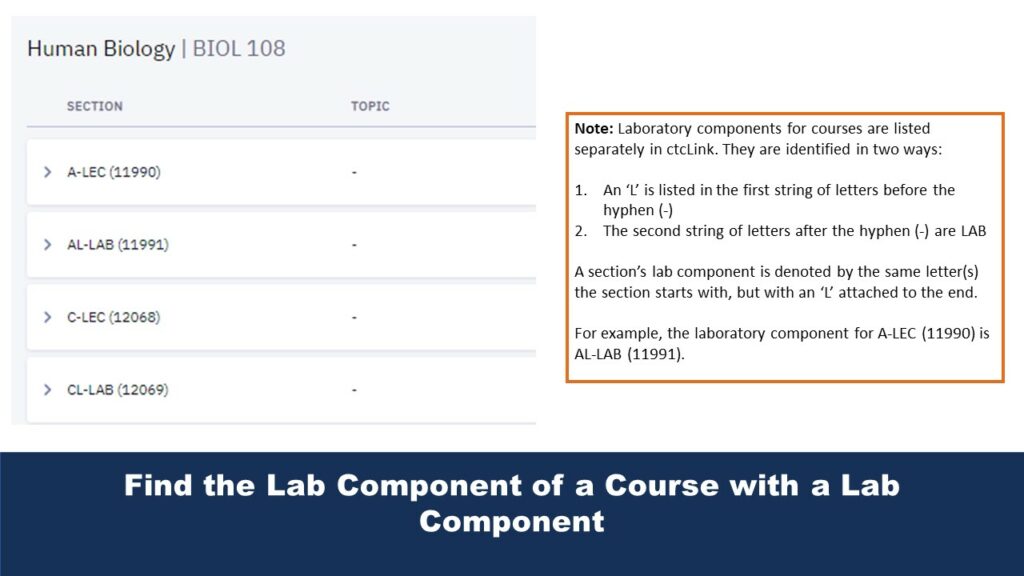
Find the Lab Component of a Course with a Lab Component
Note: Laboratory components for courses are listed separately in ctcLink. They are identified in two ways:
An ‘L’ is listed in the first string of letters before the hyphen (-)
The second string of letters after the hyphen (-) are LAB
A section’s lab component is denoted by the same letter(s) the section starts with, but with an ‘L’ attached to the end.
For example, the laboratory component for A-LEC (11990) is AL-LAB (11991).
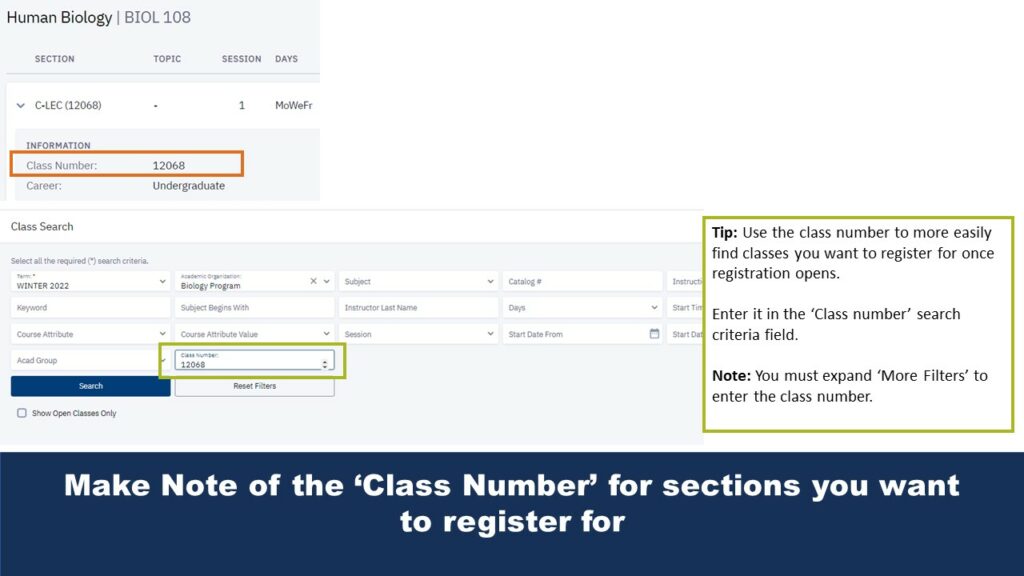
Step Nine: Make Note of the ‘Class Number’ for sections you want to register for
Tip: Use the class number to more easily find classes you want to register for once registration opens.
Enter it in the ‘Class number’ search criteria field. Note: You must expand ‘More Filters’ to enter the class number.
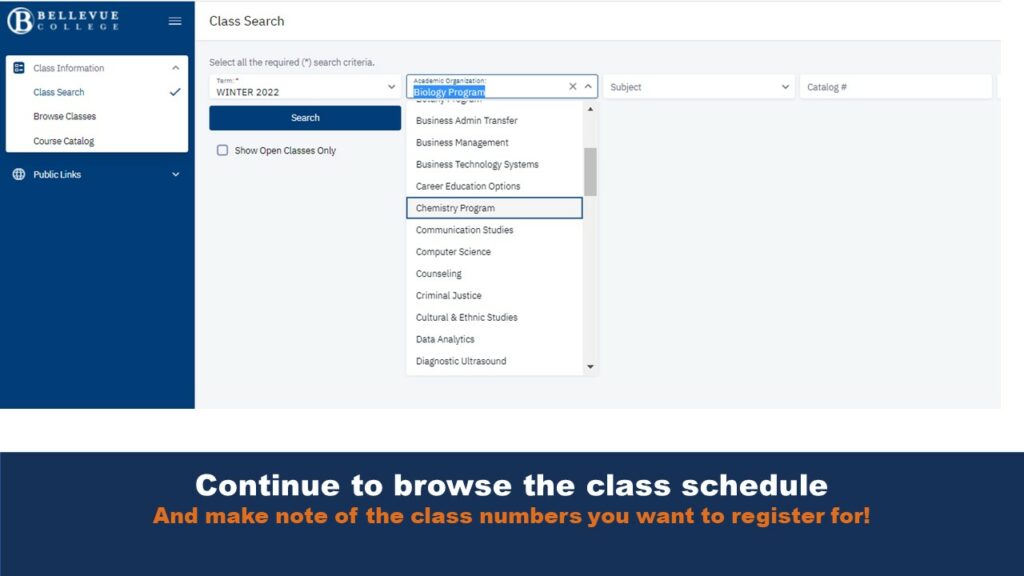
Step Ten: Continue to browse the class schedule and make note of the class numbers you want to register for!
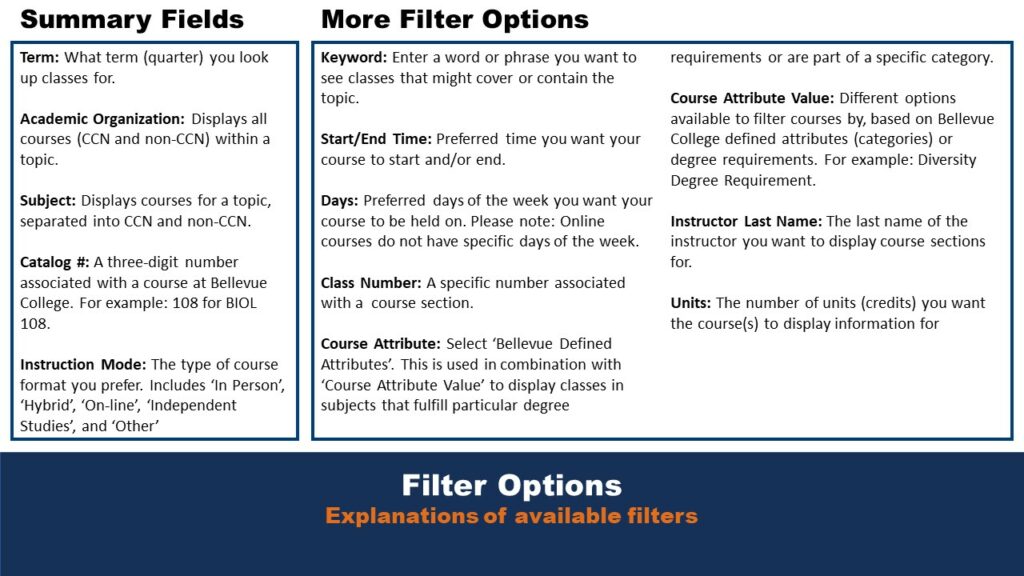
Filter Options include:
Summary Fields
Term: What term (quarter) you look up classes for.
Academic Organization: Displays all courses (CCN and non-CCN) within a topic.
Subject: The subject of the courses you want to display information for.
Catalog #: A three-digit number associated with a course at Bellevue College. For example: 108 for BIOL 108.
Instruction Mode: The type of course format you prefer. Includes ‘In Person’, ‘Hybrid’, ‘On-line’, ‘Independent Studies’, and ‘Other’
More Filter Options
Keyword: Enter a word or phrase you want to see classes that might cover or contain the topic.
Start/End Time: Preferred time you want your course to start and/or end.
Days: Preferred days of the week you want your course to be held on. Please note: Online courses do not have specific days of the week.
Class Number: A specific number associated with a course section.
Course Attribute: Select ‘Bellevue Defined Attributes’. This is used in combination with ‘Course Attribute Value’ to display classes in subjects that fulfill particular degree requirements or are part of a specific category.
Course Attribute Value: Different options available to filter courses by, based on Bellevue College defined attributes (categories) or degree requirements. For example: Diversity Degree Requirement.
Instructor Last Name: The last name of the instructor you want to display course sections for.
Units: The number of units (credits) you want the course(s) to display information for
Video Tutorial of Step-by-Step ctcLink Class Search Tutorial
Demonstration of Class Search in ctcLink
Last Updated September 18, 2023