About Enrollment
Read on for important information related to Enrollment at Bellevue College.

Enrolling in classes at Bellevue College is easy. We’re happy to have you and are here to help you with any questions you may have. Small class sizes, instructors who care, and affordable options are just some of the reasons enrolling at Bellevue College is a great idea.
It’s a great time to move forward with an education that can help you reach your goals.
When can you enroll in classes?
Continuing students can begin to enroll for classes during their assigned enrollment time. You may see or hear this referred to as an “enrollment appointment.”
You can check your enrollment time by logging in to your ctcLink account, and then using the menu to the left, click on Enrollment and then Enrollment Dates. There is also a step-by-step tutorial for how to find your enrollment date.
Continuing students are assigned enrollment priority based on the total credits completed at BC.
New students enroll during the open enrollment period. Check the Academic Calendar for open enrollment dates for each quarter.
See the step-by-step checklist for students who have completed their application to Bellevue College. See how to apply to Bellevue College.
If you have not taken classes for at least 2 years, you will need to submit a new application. If it has been less than 2 years but more than 4 quarters since you last took classes, you can submit a request for Term Activation. Students returning after not taking classes for four or more quarters enroll during the open enrollment period. Check the Academic Calendar for open enrollment dates for each quarter.
Important Dates
For quarterly enrollment dates, tuition due dates, deadlines related to refunds, withdrawal deadlines, and other important dates, please see the Academic Calendar.
Enrollment Services Frequently Asked Questions (FAQ):
There is a step-by-step guide.
It is important when you select “I will be enrolling as a…” that you select the correct option.
College in the High School: This is a dual credit program where participants are taking college credit in their high school. Only participants of the College in the High School program should select this option.
First Year: This will be your first year attending college of any kind. (This is the default option if you are not sure what to select).
Reapplying: You attended Bellevue College in the past.
Running Start (Do NOT select this option).
Transfer: You earned credit at another college and will request Bellevue College to evaluate your coursework for transfer credit.
When selecting “Program” under Start A New Application. The following options are:
Academic: You plan to earn a two-year degree, the first two years of a four-year (bachelor’s) degree, or you plan to transfer to a university.
Baccalaureate: You plan to earn a Bachelor’s degree offered at Bellevue College.
Non-Award Seeking: You plan to take college-level courses without a specific plan for a degree or certificate yet. Select this option if you are planning to just take a few classes to transfer them back to your home institution.
Professional Technical: You plan to earn a credential, degree, or certificate, that is focused on training for a specific career or skill.
Transitional Studies: (Do NOT select this option if you plan to transfer to a university. Select Academic for that option). You plan to take classes as an adult to get your GED, Basic Education for adults, or English as a Second Language. For example, Adult Basic Education math classes may help students learn math operations and to add, subtract, and divide whole numbers.
The sooner you apply, the better.
Class enrollment typically ends near the beginning of the quarter but you can see on the academic calendar the specific dates. Since processing your application can take a few days, the recommended last date to apply is also posted on the academic calendar.
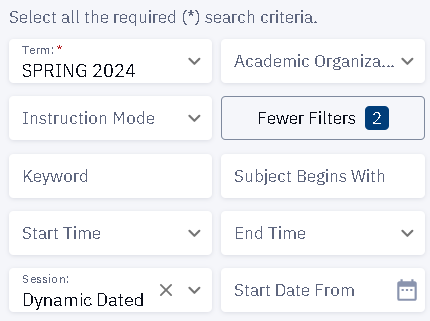
However, there are some “late start” classes each quarter which may not begin until a couple of weeks into the quarter. These are called “Dynamic Dated” classes since some classes may even finish early. To view late start classes that are available go to Class search, select the correct term/quarter, then select “More filters”. Select “session” and then “Dynamic Dated”. When you search using that filter, you will find classes that occur outside of the standard quarter start and end dates.
For regular classes, registration after the first week of the quarter (fall, winter, and spring) requires both instructor and division dean approval. The college charges a late fee for registering after the first week of the quarter.
Summer quarter, late start (Dynamic Dated), and continuous enrollment (Open-entry/Open-exit) classes have different deadlines.
See our admitted students checklist to make sure you’ll be ready to enroll on time.
Applications can be canceled for the following reasons:
1) Multiple applications are submitted. We only process 1 application and cancel any additional applications.
2) Applicant has indicated that they are an International student. International students have a separate admissions process.
You can contact enrollment if you have any questions about your application.
First, confirm that you are logged into your ctcLink account and under the Bellevue College profile. You can go here to log in. If you see your name in the bottom left of the desktop view, you are logged in. If you are logged in but it is still not working, then contact Enrollment Services so we can troubleshoot the issue with you.
The permission number box always appears in case a student needs to use a permission number* to complete their enrollment in a class. If you are not using a permission number, click Continue to proceed with your enrollment.
*Permission numbers are used to override enrollment situations – closed class, prerequisites not being met, instructor permission required, or late registration. Students request permission numbers from instructors. You can follow this step-by-step guide if you need to use one as well. You can look up the instructor’s email using the directory.
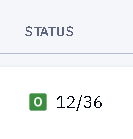
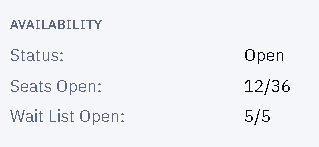
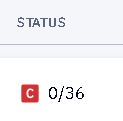
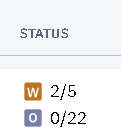
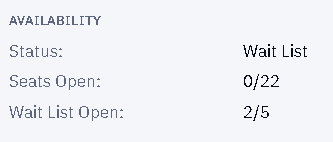
Using the Class Search you will find the “Status” with a green “O” for open to enroll. There will be two numbers separated by a “/” slash.
The first number on the left of the slash “/” is the number of seats available in the course.
The second number on the right side of the slash “/” is the number of total seats in the course.
For example, if there is a class with 24 students enrolled in a course that has 36 maximum seats, the class would say: Status: 12/36
To view your place on the waitlist, you will need to first log into your ctcLink account.
Once you are logged in, the “Enrollment” tab (which looks like a graduation cap) will have a list of options. Click once on the bottom option “View Wait List”. The very right-hand side has “List position” which will show you what number you are on the waitlist. If yours says “1” that means you are the next person up to be added to the class. For example, if it says “3” that means there are two people ahead of you on the waitlist.
As a student under the age of 18, it is important to ensure that you are ready to begin your classes here at Bellevue College. There are many different programs for taking college credit for students under 18. If you are not going to start with any of those, you will apply using the general admission application and extra information about required documentation will be provided in your welcome email.
It is extremely common, especially over the summer quarter, for students to take classes at BC in order to transfer them back to their main university/college (home institution). Make sure to select non-award seeking as your program on the admissions application. You will complete the application process and once you set up your netID, you may need to provide your unofficial transcript or take placement testing to get your account coded to reflect that you meet the required pre-requisites for the course(s) you want to take. If you are not sure if the class you are taking here at BC will transfer to your home institution, you will need to check with your home institution’s course equivalency guide or your home institution’s academic advisors. Bellevue College can not determine what classes another school may accept but most schools will have their course equivalencies posted easily on their websites. Once you complete the class, you can order an official transcript be sent to your home institution so they can accept the college credit for the course.
The “Resident/Non-Resident” title refers to your residency for tuition purposes. This is determined by your responses to the residency section in the online admissions application. If your tuition shows “Resident” this means you are considered a Washington State resident and will pay the in-state tuition rate. If your tuition shows “Non-Resident” this means you are considered an out-of-state resident for tuition purposes. You can view the tuition rates and fees on the Tuition and Fees website. You can find out more about residency for tuition purposes on the Residency website.
Your Canvas messages and BC email address are often confused.
Your BC Email address (also referred to as NetID) is where important information about registration, financial aid, campus events, College supports, BC FYIs, and other emails are sent. Your BC email can be accessed here: https://outlook.com/owa/bellevuecollege.edu.
Your Canvas inbox is found when you log into Canvas and selecting “inbox” (Typically on the left hand side for a desktop). Your canvas inbox is where your instructor will send you messages and how you can communicate about your coursework to your teachers.
You can request an official transcript to be sent to an employer, school, yourself, or more here: https://www.bellevuecollege.edu/current-students/records-grades/transcript-request/
Sending it online through Parchment is the cheapest, most common, and most accepted way to send an official transcript. BC has partnered with Parchment to provide a web-based transcript service. Through Parchment, you may request an official transcript to be sent electronically, or a printed copy by mail, and you may attach any required documents to your transcript request. Ordering your transcripts in-person is also an option.
You get your ctcLink ID number in your “Welcome to BC” acceptance email a few days after you apply. If you remember your Bellevue College email address (NetID) and password, you can go to our service page to display your ctcLink ID number instantly. If you do not know your Bellevue College email address you can request it from Enrollment Services.
To continue your education at Bellevue College after graduating high school, all you need to do is enroll in courses for the following quarter after finishing Running Start.
Here are a few recommendations to ensure your success:
Update your contact information:
After leaving high school, you might still have your school district email set as your primary email address. It is important to review and update your contact information (including your phone number and mailing address). Here is a guide to updating your contact information in ctcLink.
Determine what classes you should take:
If you have not done so already, you should meet with an Academic Advisor who can help you create a quarter-by-quarter educational plan, answer questions about the transfer process, help you understand the advantages of a Direct Transfer Agreement (DTA), and more.
Apply for financial aid:
Get started on your financial aid application as soon as you can. See how to apply for Financial Aid. The priority deadline for completion is often several months prior to the start of the quarter. Missing the deadline means you might need to self-pay for tuition and fees first, then have financial aid reimburse you for any eligible funds later. Learn more about financial aid deadlines here: [Academic Calendar and Important Dates and Deadlines – Bellevue College]. If you need more guidance about the financial aid process, Contact the Financial Aid Office.
Pay your tuition and fees:
Be mindful of tuition due dates, which are posted on the Academic Calendar. Each time that you enroll in a class (or are enrolled into a class from a waitlist), you will incur a balance on your account. If you do not make payment or payment arrangements, you may be dropped from all your classes – even if the owing balance is for just one class.
Double check that you are being charged the correct amount by reviewing Bellevue College’s tuition rates and fee descriptions. If your initial Bellevue College application had inconsistencies with residency for tuition purposes (which determines whether you pay “in-state” or “out-of-state” tuition rates), you might not have noticed while you were in the Running Start program, since your tuition was mostly covered. Once you have left Running Start, you might have a higher tuition rate if your residency status is not correct. In these cases, our Residency Department will assist you with updating your residency status when appropriate.
Attend the New Student Orientation:
The New Student Orientation (NSO) for general students answers many questions about starting out as a new-to-college student. Although this is similar to the Running Start Orientation, it is still a good idea to complete the NSO Canvas course to understand processes outside of the Running Start program.